Introduction
The Crowd system is made to generate Modular Building/Cities and trash to your game environment in a fast and easy way , Crowd procedural consists of two procedurals system ( Procedural Building , Procedural Trash ) , so let’s start by talking about how you will use it , first let’s talk about procedural trash.
Warning
Before using crowd procedural,make sure to follow some steps which will import some important tags in your project automatically,which are used to make the asset work without any errors.

- At the top of the unity window, after installing crowd procedural package, you should see a new menu item called ( Tools )
- Press on it to get the ( Import Crowd Tags ) button to import the important tags automatically without losing your old tags
Make sure that the buildings are on the scene before you start the generating process, after you are done you can delete them from the scene.
This asset is not optimized enough to let it in your game project after using it , so when you finish building buildings or generating trash you can delete the asset's handler object from the scene .
How to use procedural trash
You can easily make procedural trash object in the scene from Procedural Trash menu item

Let’s check out what can procedural trash can do
Note :
- You must attach trash game object prefabs or trash objects from the scene
- You have to add Rigidbody to your trash object then crowd will remove it after generating , but if you didn't so crowd will add it with unity's default settings
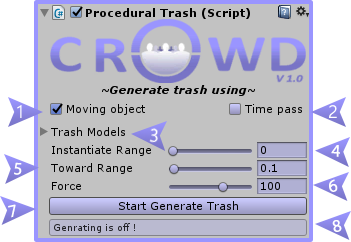
- Moving Object : crow asset gives you two ways to generate trash the easier method for you , by this method you can generate trash when you drag / move the game object in the scene so you can control on how much and where you want to generate trash .
- Time Pass : this method is the second method to generate trash,and it generates the trash with the generate rate value that you input .
- Trash Models : An empty list that you can use to add the trash models to it, the models will be used in generating the trash, set the size of the list then start adding the trash models .
- Instantiate Range : The procedural trash instantiate range is used to define the bounds of where the trash will instantiate .
- Range : The procedural trash range is used to define the bounds of where the trash will go, as if range = 0 that means that the trash will be placed underneath the manager object .
- Force : It’s the Momentum of the trash object from the manger object .
- Start / Stop Generate Trash : A button to start and stop generating trash .
- An info box that inform you the status of the crowd procedural trash to tell you if generating is off or on .
so , now you can set up your component and start generating trash by Moving the object at the scene window if you use Moving Object method or set the value of generate rate if you use Time Pass method .
After you finish the trash generation, you would for sure want to save your work, the asset is currently working on play mode, so your data won't be saved if you stopped the game, first press on stop generating trash button, in the hierarchy window you can see a new object has been instantiated with the name (Trash), it should contain all the trash objects,let's open it up and check how we can save our work
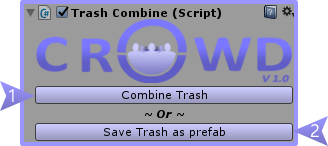
so that component is what you are going to find at the trash parent object
so you must press on of those two buttons to save your work , then you can go out from the play mode.
- Combine Similar : is to Combine all the trash objects in one combined mesh with it's materials as sub-materials .
- Save Trash As Prefab : is to save the trash objects parent as a prefab .
so you must press on of those two buttons to save your work , then you can go out from the play mode.

|
Where is my trash objects that i made !? |
Do not worry your trash object had been saved at Assets > CombinedTrash
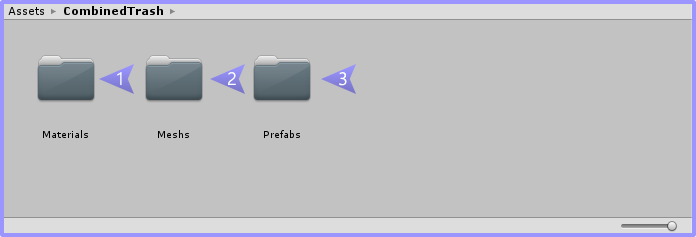
- Materials : a folder that contains the materials of your trash if you had combined trash mesh object .
- Meshes : a folder that contains your trash combined meshes if you had combined trash mesh object .
- Prefabs : a folder that contains prefabs of your trash object that you had made so you can just drag it and drop it at the Hierarchy window to restore it's rotation / position .
Now we are done talking about crowd procedural trash let’s talk about our procedural buildings

How to Use Procedural Buildings
You can easily make procedural buildings object in the scene from Procedural Buildings menu item

Let’s check out what can procedural Buildings can do
|
|

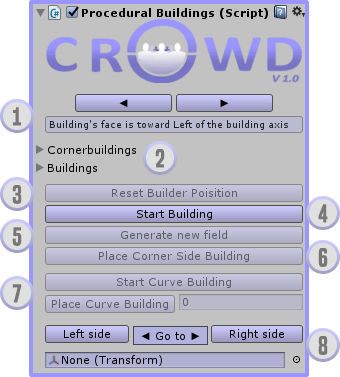
- Buildings face direction : two arrows let you control on the buildings face direction relative to your building axis , and an info box inform you by the current building face direction
- Corner Buildings : a list of the corner buildings objects that you will use , you can import it here.
Buildings : a list of the buildings objects that you will use, you can import it here. - Reset Builder Position : a button that can be used when you make changes on the buildings positions after generating it and you want to start generating new buildings starting from the last building position.
- Start / Stop Building : used to start / stop generating buildings
- Generate new field : a button used to generate a new path/field of buildings,after pressing that button you will have to start creating buildings at right , left , backward or forward direction .
- Place Corner side Building : a button used to place corner side building and reset the builder position for you so you can resume building directly without re-setting builder position .
- Start / Stop Curve Building : a button to inform crowd when you press on it that you will start building curve building so it will stop receiving normal building orders and will just build curve buildings until you finish and press on Stop Curve Building .
Place Curve Building : a button used to place curve building with the angle that is inputed at it's float field, every press the asset increases the angle value on what you added previously.
for example if the input is 10, the output will be 10 , 20 , 30 , 40 , etc.. , so if you want the asset to build a field of buildings with deviation of 10° then make the first curve building = 10° then set it to zero after the first curve of building to keep it like you want. - Go To : a tool that help you translate the builder between the buildings easily and start building starting from their , all you have to do is to import the building that you wish to translate to and set the side of building that you want to translate to and press on Go To button
so now you can setup your components and start.. , wait a minute let me tell you how to use the procedural buildings
First you have to set up your buildings , no worries it's so easy
- First you have to make sure that the building's face is toward the z-axis
- Second the crowd asset is works by the Collider Boundaries ,so you have to set up your collider boundaries to fit you building or get your building's extension out / in the building layouts setup calculations , and as the asset works by the collider boundaries so the object scale must be ( 1, 1, 1) to get good results .
it's not really a problem , you can make a new object as a parent and set it's child (building object ) position to (0, 0, 0) to be centered , then you can adjust it's rotation and rescale the building object as you want but what is really important is that the parent object that will crowd deal with rotation sat as (0, 0, 0) and scale as (1, 1, 1) then you can add BoxCollider Component in the parent object and set your collider boundaries to fit the building as you want
This Gif can help you in worst cases
Now your building setup is done let's see how you will deal with the builder
After set up your component start the Play mode and press (Start Building) , Make sure the the y-axis of the manger object at the ground to generate buildings on that y-axis value , then start moving the x-axis for left or right path for generating buildings or move the z-axis for toward or backward path for generating buildings
Warning
While you're building on left/right/forward/backward axis don't start build on another axis immediately you have to use Generate new field or Stop building first
Well this video can show you all crowd's features and how you should use it
After watching this video, you will notice how fast Crowd procedural Buildings can be in building your environment in an easy way with adjacent-regular buildings in any layout of buildings you wish to do, not only that but crowd procedural can also build buildings in complex shapes by building them in a curvy path, and this can be done by setting your angle of deviation,also this asset support building corner side buildings and it re-set the object position automatically in the correct position,so the asset is always ready to build new buildings in adjacent-regular way anytime you want to add new fields/build again , you should also notice how easy the transporting between the buildings is which can be used to build more buildings in different positions, at the end of the video you saw how you can close a gap between different fields of buildings, crowd procedural gives you the ability to rotate and resize the buildings field and also saving your adjacent regular layout.

|
So here you go , start your level designing and finish it in fast in easy way using our procedural buildings and trash , your feedback matters to us, please don't forget to give us a feedback,you can also mention us in your game if you want to help us :D
|
A trick here
If you are looking to combine some assets, or wondering if you can use the combine component of the crowd procedural asset, you simple can!
- Just make a new Empty GameObject and import all your models that you want to combine to the new empty gameObject as childes (This Empty GameObject position will be the origin of your new combined model )
- at the new empty gameObject Press AddComponent and type trash combine and press on the Trash Combine script component then start Combining and it’s gonna save you ( meshes and prefab ) at Assets > CombinedTrash , then you can use it anytime you want or edit your combined object from Assets > CombinedTrash > Meshs
